Recliner Button Switches, Seat Mounted Buttons
Mulin 2 Button Switch MLSK39
$35.00
Out of stock
Replacement Mulin Electric MLSK39 two-button controller for power recliners and lift chairs. Matte-black snap-on fascia conceals two gloss-nickel buttons, mounting screws included, and the attached 1.5m lead with straight 5-pin DIN plug delivers true plug-and-play convenience. Mounts on the arm or seat sidewall and restores smooth up/down action in minutes. 5 Pin 2-Button Recliner Arm Switch. Compatible with Mulin, Kaidi, Okin, Limoss and other brands using the standard 5-pin DIN loom, this matte-black module swaps straight in; simply reuse your original screws, connect the 1.5m lead and recline again. Not the Switch Your Looking For? We stock all the popular recliner switches (click here). If you are still not sure which replacement power recliner chair or sofa switch is right for you please contact our helpful team. read more
Out of stock
- Description
- Technical Specifications
- How To Tutorial
- Reviews (0)
- FAQs
- Add a review
Description
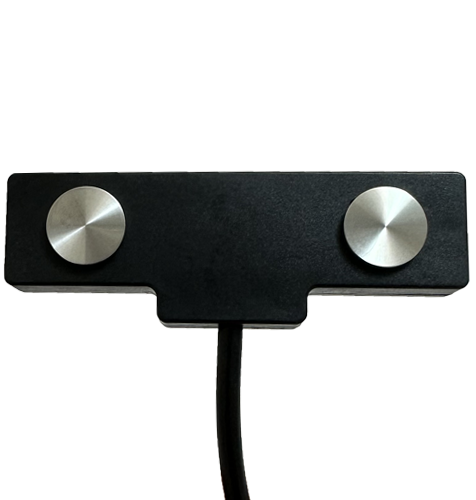
Universal 5 - Pin Recliner Arm Switch – Mulin Electric MLSK39
Restore smooth open and close control to your electric recliner, sofa or lift chair with this Mulin Electric MLSK39 two-button switch. Housed in a matte-black ABS module, the snap-on fascia hides mounting screws for a clean finish, while the twin gloss-nickel buttons give positive tactile feedback. A pre-wired 1.5m lead terminates in a straight 5-pin DIN plug, so you can plug in and relax within minutes.
Plug-and-Play Replacement for Common Two-Button Assemblies
Designed for the industry-standard 29V control circuit, the MLSK39 swaps straight over with many two-button 5-pin units labelled Kaidi KDH051-306, KDH051-301, KDH051-308, generic 31100563-A and similar models. It can be mounted on either the arm or seat-side wall using the original two screws (not supplied).
We're Australia's Leading Supplier of Recliner Chair Spare Parts
As Australia’s leading supplier of genuine and compatible recliner spares, we source directly from trusted manufacturers such as Mulin Electric. That means the wiring, pin-out and fixing points mirror your original part for a hassle-free swap.
Save Time & Money and Do It Yourself
Replacing a faulty arm switch is quick and novice-friendly. Just remove the screw cover, undo two screws, disconnect the old plug, and reverse the steps with the new unit. No special tools or prior experience required—just a Phillips screwdriver and five minutes of your day. Follow our step-by-step guides and video tutorials, feel the satisfaction of a job well done, and keep more dollars in your pocket.
Technical Specifications
Technical Specifications
Technical Specifications
| Model / Part Number | Mulin Electric MLSK39 |
|---|---|
| Function | Momentary UP / DOWN control for a single-motor electric recliner, sofa or lift chair |
| Buttons | 2 × gloss-nickel tactile rockers (no USB, no back-lighting, no “Home” button) |
| Housing / Finish | Matte-black ABS module with snap-on screw-cover fascia |
| Mounting | Recessed fit with 2 x screws (not supplied); suits arm or seat-side wall |
| Cable Length | 1.5 metres (lead from switch rear to DIN shell) |
| Connector | Straight 5-pin round DIN male plug. |
| Operating Voltage | 29 V DC (2 A control circuit) |
| Overall Dimensions* | Approx. 83 mm (L) × 33 mm (W) × 43 mm (D) |
| What’s Included | 1 × MLSK39 switch with attached 1.5 m lead (mounting screws re-use originals) |
*Dimensions measured across switch body; allow extra clearance for cable exit.
How To Tutorial
How To Tutorial
Installation Instructions
- Isolate the Power
Unplug the recliner’s transformer from the wall socket (and remove any battery-backup lead) to ensure zero voltage is present while you work. - Position the Chair Safely
Tilt the chair onto its side or back with assistance to avoid strain and protect flooring with a blanket or cardboard sheet. Never lift heavy furniture alone. - Take “Before” Photos
Use your phone to photograph the old switch in place, the cable routing and the 5-pin plug orientation. These reference shots make re-assembly fool-proof. - Remove the Fascia
Gently pry the matte-black snap-on cover off the old switch with a plastic trim tool or fingernail to expose the two mounting screws. - Undo the Screws
Using a #2 Phillips screwdriver, remove the two screws while supporting the switch from behind so it doesn’t drop inside the cavity. - Disconnect the Old Lead
Trace the cable to the control box, release any cable clips, then pull the straight 5-pin DIN plug out squarely to avoid bending pins. - Install the New Switch
Route the MLSK39’s 1.5 m lead along the same path. Plug the 5-pin DIN connector firmly into the matching socket, ensuring pin alignment. - Screw the Switch in Place
Seat the new module in the cut-out (arm or seat sidewall) and reuse the original two screws. Tighten until snug—do not overtighten. - Refit the Fascia
Press the snap-on cover until it clicks all round, hiding the fixings and revealing the twin gloss-nickel buttons. - Return the Chair & Test
With help, lift the recliner back to its normal position. Reconnect the mains power, then test UP and DOWN functions to confirm smooth operation.
Tip: Retain the old switch and screws until you’re satisfied the new unit works perfectly.
Reviews (0)
Thank you for making an effort to leave a reivew but to protect against spam we only accept reviews from verified owners. Please proceed to login using the same email address you used when ordering the product.
Customer Login
- There are no reviews yet.
FAQs
FAQs
Will this switch work with my recliner?
The MLSK39 is designed for single-motor recliners that use a straight 5-pin round DIN control plug (Kaidi, Mulin, Okin, Limoss, etc.). Count the pins on your existing plug—if it’s five and round, you’re good to go.
Does it include mounting screws and a backing plate?
The switch ships exactly as pictured—one pre-wired module with a 1.5 m lead. Simply reuse the two screws already holding your old switch (or substitute similar 4–5 mm pan-heads). No plate is required; the snap-on fascia hides the screw heads for a clean finish.
How do I tell which way round the DIN plug goes?
The male DIN plug has an alignment notch. Line this up with the keyway on the socket, then push straight in—never force or twist. We recommend taking a quick photo of the old plug orientation before unplugging.
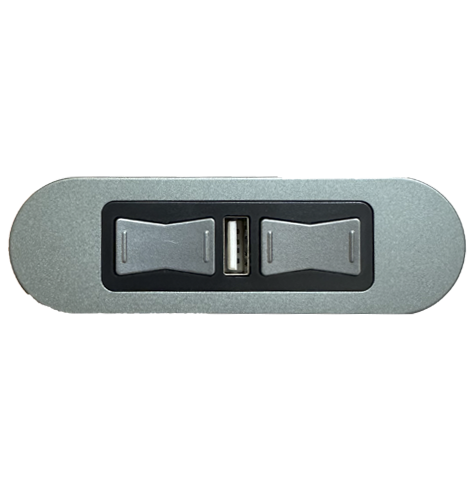
My original switch has USB charging—can I swap to this unit?
Yes, but you’ll lose the USB function. If you need charging or extra buttons (headrest, lumbar, “Home”), choose one of our multi-function MLSK-series or KDH-series switches instead.
Can I install it myself or should I call a tech?
It’s a novice-friendly five-minute job: unplug the chair, pop off the old switch cover, unscrew two screws, swap plugs, refit. A Phillips screwdriver is the only tool required. Our step-by-step guide and support team are here if you need help at any stage.