Handset Remotes, La Z Boy Spare Parts
TH6-1003-001 Remote Controller 8 Pin+ Key
$79.00
In stock
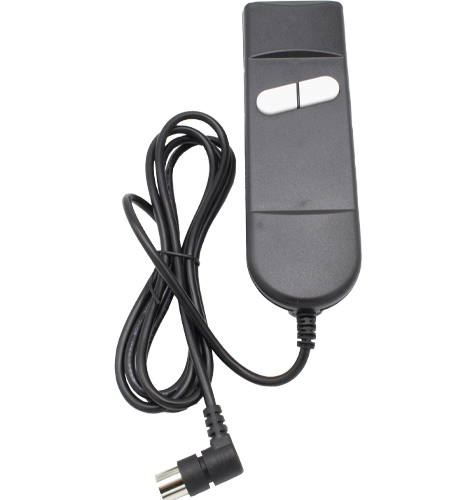
Replacement TH6-1003-001 TiMotion 2-button remote handset with integral 8-pin right-angle DIN plug and 1.97 m lead for single-motor lift chairs and two-function electric recliners. Built-in removable safety key disables the buttons for child-lock security, and a clip-on storage hook keeps the wand stowed neatly. Simple plug-and-play swap—no tools, no programming. 2-Button 8-Pin Lift Chair Remote. Built for TiMotion 8-pin systems. The fixed 1.97 m lead with right-angle strain relief matches the original loom for a neat arm-pocket route. Includes clip-on hook and removable key that locks the buttons for child safety. Need a 5-Pin or Different Remote? See our full range of lift-chair remotes (click here) or chat with us to confirm pin count before ordering. We stock both 5-pin and 8-pin wands plus cables, so you’ll always find the right match. read more
In stock
- Description
- Technical Specifications
- How To Tutorial
- Reviews (0)
- FAQs
- Add a review
Description
8-Pin 2-Button Lift-Chair Remote Handset – TH6-1003-001
Designed for single-motor lift chairs and two-function power recliners that run TiMotion’s 8-pin control boxes, this handset restores smooth Up/Down (Lift/Recline) operation in seconds. It arrives as a one-piece unit with a fixed 1.97 m lead and right-angle 8-pin DIN plug, plus a detachable storage hook for tidy arm-pocket stowage and a removable key that disables the buttons for child-safety locking.
Removable Safety Key & Clip-On Storage Hook
Slip the key out to disable the rocker switches and prevent accidental activation—handy around kids, pets or during cleaning. The supplied hook screws or cable-ties to the chair frame, keeping the wand off the floor and close at hand.
Need the 5-Pin Version Instead?
The shell looks almost identical, but 8-pin and 5-pin wands are **not cross-compatible**. Count the pins before ordering—if your plug has 5 pins, grab our TH6-1053-001 5-Pin Remote (click here) instead. Still unsure? Send us a photo of your plug and we’ll confirm the match.
Do It Yourself and Save $$$
Replacing the remote is a two-minute DIY job—unplug the old DIN, route the new lead, click it home and relax. Follow our step-by-step guide or video tutorial, feel the satisfaction of a job well done, and keep repair costs in your pocket.
Technical Specifications
Technical Specifications
Technical Specifications
| Product Name | TiMotion TH6-1003-001 2-Button Lift-Chair / Recliner Remote |
|---|---|
| Part Number | TH6-1003-001 |
| Buttons / Functions | 2 rocker buttons — Up / Lift and Down / Recline |
| Plug Type | 8-pin right-angle DIN male, integral locking-key collar |
| Cable |
|
| Extras Supplied |
|
| Compatibility |
|
| Electrical | < 30 V DC low-voltage momentary-switch signalling; negligible current draw |
How To Tutorial
How To Tutorial
How to Replace Your 8-Pin Lift-Chair Remote
- Unplug the Chair from Mains Power
Always disconnect the wall plug or switch the power board off before working on any electrical furniture. - Position the Chair Safely
If you need to tilt or roll the chair for access, use safe-lifting techniques:- Keep your back straight, bend at the knees, and lift with your legs.
- Get a helper for heavy furniture – two people sharing the load is best practice.
- Clear the floor area to avoid tripping hazards.
- Take “Before” Photos
Use your phone to photograph the existing cable path and 8-pin DIN plug location. These shots help you route the new lead exactly the same way. - Remove the Old Handset
- Unclip the storage hook (if fitted) from the chair frame or arm pocket.
- Press the lock collar and pull out the 8-pin DIN plug from the control box.
- Gently pull the handset and lead out of the fabric pocket or cable clips.
- Install the New TH6-1003-001 Handset
- Feed the new lead through the same cable path (refer to your photos).
- Insert the right-angle 8-pin DIN plug until it *clicks* – do not force.
- Clip or screw the supplied storage hook in a convenient spot, then hang the handset.
- Optional: Fit or Remove the Safety Key
Insert the yellow safety key when you want normal operation. Pull it out to disable the buttons (child-lock). - Take “After” Photos
Snap new pictures of the routed cable and plug connection. Compare with your “before” shots to confirm everything matches. - Restore Power and Test
Plug the chair back into the wall socket, switch on, then press the Up and Down buttons to verify smooth lift and recline. - Dispose of the Old Remote Responsibly
E-waste recycling centres will accept the handset and cable – keep electronics out of landfill.
Tip: If the chair still does not move after installation, double-check that the 8-pin plug is fully seated and that the wall outlet is switched on.
Reviews (0)
Thank you for making an effort to leave a reivew but to protect against spam we only accept reviews from verified owners. Please proceed to login using the same email address you used when ordering the product.
Customer Login
- There are no reviews yet.
FAQs
FAQs
How do I know if this 8-pin handset will fit my lift chair?
Count the pins on the round DIN plug coming from your existing remote—if you see eight metal pins (plus the alignment notch), this TiMotion TH6-1003-001 is the correct style. Five-pin systems require a different handset (e.g., TH6-1053-001).
Do I need any tools or special skills to install it?
No. Unplug the chair from the wall, press the collar on the old 8-pin plug to release it, route the new lead through the same path, and push the new plug in until it clicks. Total time is typically under two minutes.
What does the removable key do?
It acts as a child-safety lock. With the key inserted, the rocker buttons operate normally; remove the key to disable both buttons and prevent accidental lifting or reclining.
My old remote had a separate extension lead—will that matter?
This model has a fixed 1.97 m cable, so an extra extension isn’t required. If your original loom included a detachable lead, simply bypass it and plug this handset directly into the control box.
Can I mount or stow the handset neatly when not in use?
Yes. A clip-on storage hook is supplied. Screw or cable-tie the hook inside the arm pocket or to the chair frame, then hang the handset to keep the lead off the floor and within easy reach.