Kaidi KDH019-303 Recliner Switch
$44.99
In stock
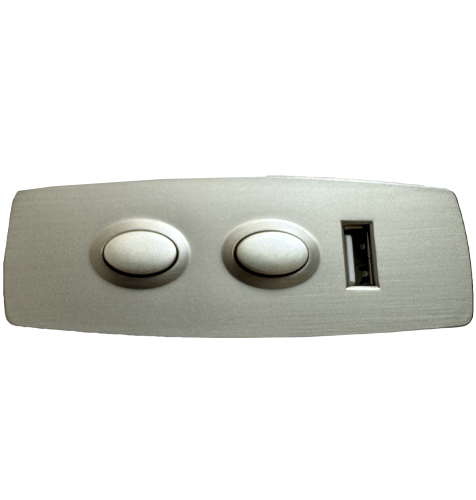
Kaidi KDH019-303, factory number MOT-TS-13L, two button oval electric recliner switch with nickel coloured facia and buttons. This left hand operated recliner switch has a straight 5 pin male DIN plug, LED light, child lock button and 1938mm cable. Used to open and close a single actuator recliner, with the front button opening and the rear button closing. Left Hand Operated Recliner Switch. This KDH019-303 switch fits the left hand side when seated in the recliner, meaning you operate the buttons with your left hand. It may also be known as RHF, meaning right hand side when facing the recliner. Need Help Finding a Replacement Recliner Button Switch? We stock many other replacements for all popular electric recliner & sofa brands and models, see our full range (click here) for a suitable replacement. Ask us if you need help choosing. read more
In stock
- Description
- Technical Specifications
- How To Tutorial
- Reviews (0)
- FAQs
- Add a review
Description
Kaidi KDH019-303 Nickel Recliner Switch with 5 Pin DIN Plug
Commonly fitted to the outer arm of power recliner chairs and lounges and having a removable plastic nickel effect screw cover, it allows for an aesthetically pleasing design and offers a discreet appearance. Complete with a child lock button to stop young people from being able to operate the recliners. This recliner switch is also compatible with many other brands such as HTL and Nick Scali lounges.
Kaidi Power Recliner Toggle Switch
Model KDH019-303 is operated from the left hand side when seated. Model KDH019-304 recliner switch (click here) is operated from the right hand side when seated.
Please check the sticker on your existing switch before ordering, as the left hand and right hand versions can look very similar but are made for different sides of the recliner.
Australia’s leading supplier of recliner chair spare parts
Sofa Rehab is one of Australia’s leading suppliers of DIY furniture repair products, including recliner spare parts, leather repair kits, cleaning products and upholstery supplies. We focus on helping customers repair their furniture instead of replacing it, with a wide range of parts and products chosen for practical do-it-yourself use.
Enjoy great value on DIY repairs, helpful product guidance and support from a team that understands furniture repair. If you are a tradesperson, repair technician or business customer buying in larger quantities, you may also be eligible for a Sofa Rehab trades account with access to bulk buy discounts and exclusive trade pricing.
Save Time & Money, Do It Yourself
You can do it yourself and save money by replacing only the faulty switch instead of paying for a service call or replacing larger electrical parts unnecessarily. Sofa Rehab is here to help with spare parts, product guidance and support so you can get your recliner working again with confidence.
Technical Specifications
Technical Specifications
| Product Type | Electric recliner button controller switch |
|---|---|
| Manufacturer | Kaidi |
| Model Number | KDH019-303 |
| Factory Number | MOT-TS-13L |
| Operation Side | Left hand operated when seated in the recliner |
| Opposite Side Model | KDH019-304, right hand operated when seated in the recliner |
| Button Layout | Two main recliner control buttons |
| Recliner Function | Front button opens the recliner, rear button closes the recliner |
| Extra Features | LED light bulb and child lock button |
| Colour | Nickel coloured facia and buttons |
| Switch Shape | Oval |
| Switch Dimensions | W 90mm x H 43mm x D 42mm approximately |
| Cable Length | 1938mm including plug |
| Plug Type | Straight 5 pin male DIN plug |
| Compatible Use | Single actuator electric recliner chairs and sofas using the matching Kaidi switch model |
How To Tutorial
How To Tutorial
How To Replace Your Kaidi Recliner Switch
Replacing a matching Kaidi recliner switch is a simple DIY job for many electric recliners. Before starting, make sure this replacement switch matches your original model number, plug type, cable position and hand operation side.
This tutorial is a general guide for replacing a like-for-like Kaidi KDH019-303 recliner switch. Your recliner may vary slightly depending on the furniture design, so take your time and check how your original switch is fitted before removing it.
Before You Start
Unplug the recliner from the wall power outlet before doing any work. If your recliner has a battery pack, disconnect or remove the battery pack as well.
Take a clear photo of your existing switch, cable route and plug connection before removing anything. This before picture is a helpful reference when fitting the new switch and can also assist our support team if you need help.
Move the recliner into a safe working position with enough space around it. Use safe lifting techniques if the chair or sofa needs to be tilted or moved. Bend your knees, keep your back straight, avoid twisting while lifting and ask another person to help if the furniture is heavy or awkward. Do not place your hands where the recliner mechanism can pinch or trap your fingers.
Tools You May Need
Most switch replacements only require basic tools. Depending on your recliner, you may need:
* Phillips head screwdriver.
* Flat head screwdriver or trim tool.
* Pliers.
* Torch or work light.
* Your phone to take a before photo.
Step 1: Disconnect the Power
Switch the recliner off at the wall and unplug the power cable. Make sure there is no power going to the recliner before touching any electrical connections.
If the recliner has recently been used, allow the mechanism to fully stop before starting the repair.
Step 2: Take a Before Picture
Before removing the original switch, take a clear photo showing:
* The position of the switch in the armrest.
* The direction the cable exits the switch.
* The cable route inside the recliner.
* The plug connection and where it connects.
* The sticker label showing the model number or factory number.
This quick photo can save time later and helps ensure the new switch is fitted the same way as the original.
Step 3: Access the Existing Switch
Carefully locate how the existing switch is held in place. Some switches are fitted with screws from the outside, while others may be secured from inside the armrest or clipped into position.
If you need to tilt the recliner to access the wiring underneath, use safe lifting techniques and get help from another person where needed. Make sure the recliner is stable before reaching underneath it.
Step 4: Disconnect the Old Switch
Follow the cable from the old switch to the plug connection. Release the straight 5 pin DIN plug by holding the plug body and gently pulling it apart from the socket.
Do not pull on the cable itself, as this may damage the wiring or connection. If there is a retaining clip or cable tie, remove it carefully and keep note of how the cable was routed.
Step 5: Remove the Old Switch
Remove any screws, clips or fasteners holding the old switch in place. Gently feed the cable out as you remove the switch from the recliner arm.
Compare the old switch with your new Kaidi KDH019-303 switch before fitting it. Check the model, plug type, button layout, cable length, cable direction and mounting side.
Step 6: Fit the New Switch
Position the new switch into the armrest in the same orientation as the original. Feed the cable through the same path shown in your before photo.
Secure the switch using the original screws, clips or fittings. Do not overtighten screws, as this may damage the switch housing or furniture trim.
Step 7: Reconnect the 5 Pin DIN Plug
Connect the straight 5 pin male DIN plug to the matching socket. Make sure the plug is aligned correctly before pushing it together.
Do not force the plug. If it does not connect easily, check the pin alignment and confirm that you are connecting it to the correct socket.
Step 8: Test the Recliner
Once the switch is fitted and the cable is safely routed away from moving parts, reconnect the recliner power.
Test the front button to open the recliner and the rear button to close the recliner. Check that the LED light and child lock button operate as expected.
Watch the cable while testing to make sure it does not catch, stretch, pinch or rub against the moving recliner mechanism.
Step 9: Final Safety Check
After testing, make sure all screws and fittings are secure. Confirm the cable is tucked safely away from the recliner mechanism and that the chair or sofa is sitting correctly on the floor.
If the switch does not work, unplug the recliner before checking the connection again. Compare the installation with your before picture and make sure the model number, plug type and side orientation are correct.
Need Help?
If you are unsure at any stage, contact Sofa Rehab for help before forcing the switch, plug or wiring. Send us clear photos of your original switch, the plug, the sticker label and where it connects, and our team can help you check the replacement part and installation.
Reviews (0)
Thank you for making an effort to leave a reivew but to protect against spam we only accept reviews from verified owners. Please proceed to login using the same email address you used when ordering the product.
Customer Login
- There are no reviews yet.
FAQs
FAQs
Is this switch left hand or right hand operated?
The Kaidi KDH019-303 is left hand operated when seated in the recliner. This means the user operates the buttons with their left hand while sitting in the chair or sofa.
What is the difference between KDH019-303 and KDH019-304?
The KDH019-303 is operated from the left hand side when seated, while the KDH019-304 is operated from the right hand side when seated. The two switches can look very similar, so please check the sticker on your existing switch before ordering.
What plug does this recliner switch have?
This Kaidi recliner switch has a straight 5 pin male DIN plug. Please compare the plug on your existing switch to make sure it matches before purchasing.
What do the buttons do?
This switch operates a single actuator electric recliner. The front button opens the recliner and the rear button closes the recliner. It also includes an LED light bulb and child lock button.
Can I replace this recliner switch myself?
Yes, many customers can replace a matching recliner switch themselves. Always unplug the recliner from power first, take a before photo of the wiring and plug connection, then fit the new switch in the same position as the original. Contact Sofa Rehab if you need help checking compatibility.