Electric Recliner Spare Parts, Recliner Button Switches
Mulin 2 Button Oval Switch MLSK25-A
$50.00
In stock
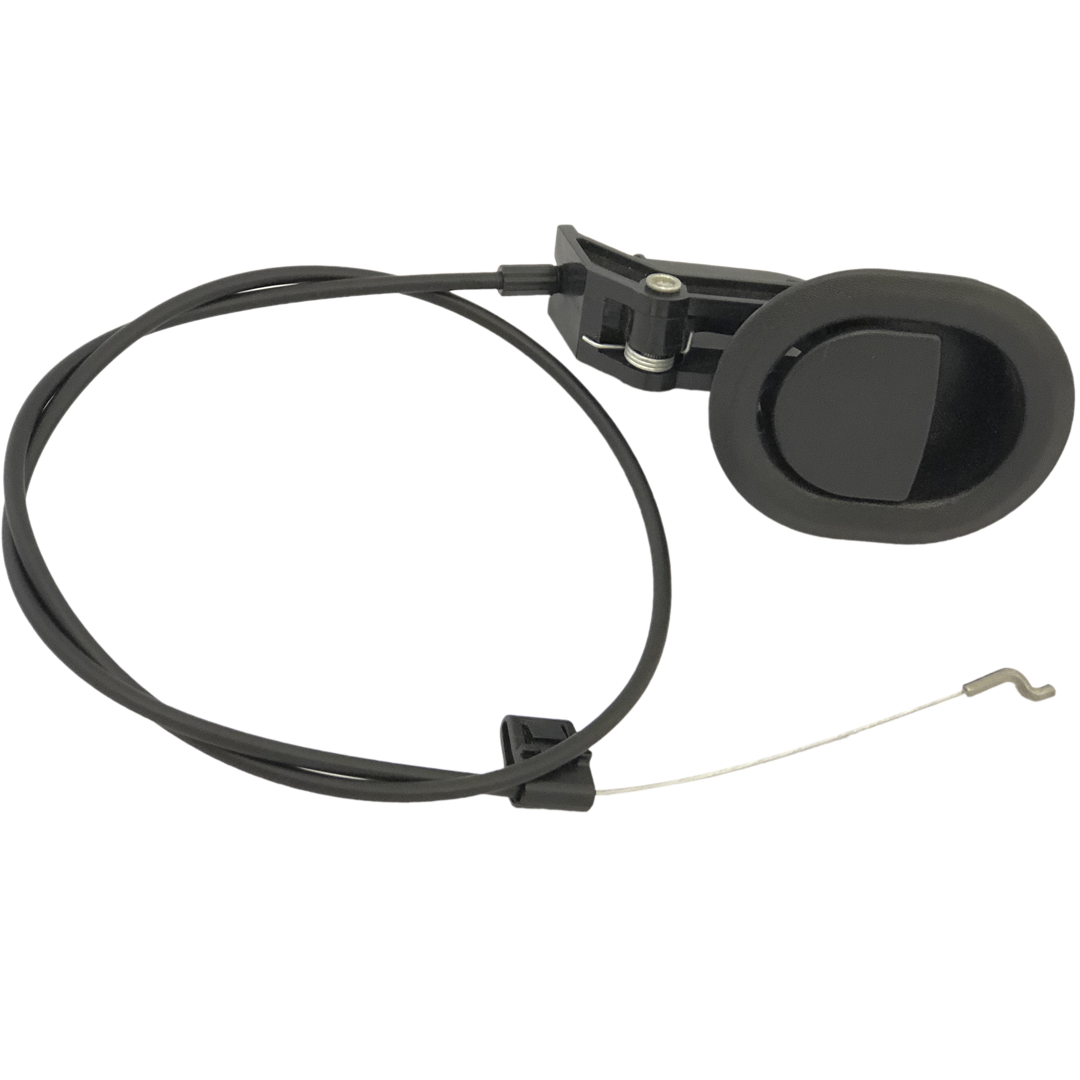
Genuine Mulin MLSK25-A two-button recliner switch with polished chrome faceplate and matching buttons. Fits neatly into a 50 × 33mm cut-out and arrives with a 1.51m loom terminating in a 5-pin DIN plug for plug-and-play replacement. Ideal for fixing non-responsive up/down controls and restoring full motion at home. Chrome 2-Button Recliner Arm Switch. A direct swap for any Mulin or compatible 5-pin two-button handset. Standard DIN plug, no tools beyond a screwdriver, and spring-clip mounting suits most lounges from Amart, Harvey Norman, Synargy, Berkley and more. Looking for another style or colour? We stock all the popular recliner switches (click here). If you are still not sure which replacement power recliner chair or sofa switch is right for you please contact our helpful team. read more
In stock
- Description
- Technical Specifications
- How To Tutorial
- Reviews (0)
- FAQs
- Add a review
Description
Chrome 2-Button Recliner Arm Switch – Mulin MLSK25-A Replacement
Give new life to electric recliners, lift chairs and motion sofas with this genuine Mulin MLSK25-A side-mounted switch. The polished chrome fascia and matching chrome buttons suit modern furniture, while the pre-fitted 1510mm lead with a 5-pin DIN plug makes it a true plug-and-play swap for any faulty up/down control. It works with all 29v DC single-motor systems that use the industry-standard 5-pin connector.
Compatible Brands, Models and Part Numbers
Factory-fitted to many recliners sold by Amart, Harvey Norman, Synargy Smart Comfort, Berkley and other popular retailers. It replaces any Mulin “MLSK25-A” or “MLSK15-A” family switch with a 5-pin plug and works with most single-motor chairs that specify a chrome two-button side switch. Unsure? Send us a photo via chat and we’ll confirm for you.
Quality Spare Parts from Sofa Rehab
Sourcing direct from leading OEM factories and trusted aftermarket suppliers, we keep an extensive range of recliner electronics, handles, cables and leather-care kits in stock ready for immediate order. Every item is tested for fit and reliability by our in-house repair technicians before it reaches our shelves, so you receive parts that work first time and last. From the smallest spring to complete power kits, if it belongs on a lounge, chances are we have it – and we stand behind every product with full technical support and clear measuring guides.
Save Time & Money and Do It Yourself
Replacing a faulty switch is a five-minute job with just a screwdriver. Follow our step-by-step video tutorial, feel the pride of a successful DIY repair, and keep money in your pocket instead of paying a call-out fee. Need extra help? Our friendly support team is only a phone call, email or live chat away.
Technical Specifications
Technical Specifications
Technical Specifications
| Attribute | Details |
|---|---|
| Model | Mulin MLSK25-A |
| Type | Two-button momentary side-mounted switch for single-motor recliners |
| Faceplate finish | Chrome-plated ABS fascia with matching chrome push-buttons |
| Overall switch size (W × H × D) | 90 mm × 44 mm × 30 mm |
| Recommended panel cut-out (W × H) | 52 mm × 35 mm (±0.5 mm) • corner radius ≈ 2 mm |
| Behind-panel depth required | 34 mm (rear housing + minimum cable bend) |
| Suitable panel thickness | 6 mm – 32 mm |
| Cable length | 1510 mm (rear housing to shoulder of 5-pin DIN plug) |
| Connector | Male 5-pin round DIN (standard recliner IO pin-out) |
| Operating voltage | 29 V DC systems (Kaidi, OKIN, TiMotion, Mulin, etc.) |
How To Tutorial
How To Tutorial
Installation Instructions – Mulin MLSK25-A Switch
Safety first: Disconnect the recliner from mains power and the transformer before starting, and use two people to tilt or lift heavy furniture safely. Take a clear photo of the existing switch and cable routing so you can replicate it later.
- Unplug the chair completely.
Remove the wall plug and disconnect the transformer lead so there is no live voltage in the system. - Tip the recliner onto its side.
With a helper, tilt the chair onto a protected surface to expose the underside of the arm. Support it securely so it cannot roll or fall. - Photograph the old switch and wiring.
Take a clear picture of the existing switch location, cable route and 5-pin plug position. This will be your reference for reassembly. - Remove the faulty switch.
Flick the Chrome facia off, loosen the two screws and slide the old switch out through the upholstery. Gently pull the cable free. - Route the new cable.
Feed the 1510 mm lead of the MLSK25-A along the same path as the original, avoiding sharp metal edges and moving parts. Replace any cable clips or add zip-ties for strain relief. - Seat the new switch in the panel cut-out.
Align the chrome fascia in the 52 mm × 35 mm cut-out, press it flush, then hand-tighten the two screws until the switch is snug but not distorted. Push the replacement facia into position until you hear a click. - Connect the 5-pin DIN plug.
Insert the plug fully into the actuator socket or junction box, matching the keyway so the pins are not bent. - Return the chair to its normal position.
Lift or roll the recliner back upright with help, ensuring cables are clear of the mechanism. - Restore power and test.
Reconnect the transformer and wall plug. Press the upper button for “feet-up” and the lower button for “feet-down” to confirm smooth operation. - Tidy up.
Secure any loose wiring with cable ties, dispose of the faulty switch responsibly, and keep your reference photo for future maintenance.
Tip: If the switch feels reversed because it is fitted to the opposite arm, simply rotate it 180 ° before tightening the retaining nuts.
Reviews (0)
Thank you for making an effort to leave a reivew but to protect against spam we only accept reviews from verified owners. Please proceed to login using the same email address you used when ordering the product.
Customer Login
- There are no reviews yet.
FAQs
FAQs
Will this switch fit my recliner?
If your chair uses a two-button side switch with a 5-pin round DIN plug and the cut-out in the arm measures close to 52 mm × 35 mm, the MLSK25-A is a direct drop-in. Snap a photo of your old part and send it to us if you’re unsure.
What does the 1510 mm cable length cover?
The lead runs from the back of the switch housing to the shoulder of the DIN plug, long enough for standard arm-to-motor routing on most single-seat recliners. For extra-wide lounges or unusual layouts, we stock DIN extension leads.
Can I install it myself without special tools?
Yes. You need only a screwdriver to remove the old retaining screws and a helper to tilt the recliner safely. The new switch secures with hand-tightened screws; the DIN plug is plug-and-play.
Is the chrome finish durable?
The faceplate is ABS with a chrome coating designed for furniture use. It resists everyday wear and cleans with a damp, non-abrasive cloth—avoid harsh solvents to keep the shine.
What if the buttons work in reverse?
The switch is symmetrical. If “up” and “down” feel swapped after installation, simply rotate the unit 180 ° in the cut-out and retighten the scrws—no rewiring required.