Okin 4 Button Handset HS.13.04.03
$69.99
In stock
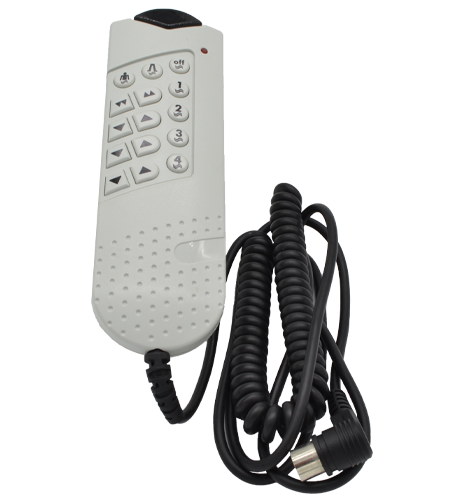
Okin HS.13.04.03 genuine replacement handset remote for dual motor lift chairs and recliners. Features 4x clearly marked buttons with illustrations for simple operation, a blue LED status light, and an integrated storage hook. Ergonomic design measuring 165mm long, 50mm wide, and 26mm thick including the buttons. Supplied with a straight 5-pin male DIN plug and coiled cable section for flexible use. Genuine Okin Handset with 4 buttons. This high-quality handset includes a illustrations on the buttons for easy visibility and user feedback. Supplied with a strong straight cable (part coiled) measuring 1470mm total length with 270mm relaxed coil. Need Help Finding the Right Remote? We stock a wide range of replacement recliner remotes (click here) for Pride and other brands. If you’re unsure which remote is right for your chair, contact us for assistance. read more
In stock
- Description
- Technical Specifications
- How To
- Reviews (0)
- FAQs
- Add a review
Description
Okin HS.13.04.03 Genuine Handset for Dual Actuator Recliners & Lift Chairs
This genuine Okin handset is a direct replacement remote control for power recliners and lift chairs fitted with dual actuators. Designed with durability and user-friendly controls in mind, it includes four illustrated buttons for intuitive operation, a built-in blue LED light for status indication, and a sturdy storage hook to keep it neatly stowed.
Easy to Use – LED Light and Clear Button Layout
The handset features four raised buttons, each with clear illustrations to make operating your recliner simple and accessible. The front-mounted blue LED indicator light provides feedback when the handset is in use.
Quality Genuine Okin Spare Part
As a genuine Okin replacement part, you can be confident of long-lasting reliability and precise compatibility with your recliner’s control system. The strong coiled/straight cable combination ensures flexibility and durability for daily use.
Australia’s Leading Supplier of Recliner Spares
Sofa Rehab is Australia’s trusted source for both OEM and universal recliner spare parts. We stock a wide range of replacement remotes (click here) along with power supplies, actuators, and accessories to suit all popular brands.
'You Can Do It' – Quick DIY Swap in Under 3 Minutes
Replacing a broken or faulty recliner handset is quick and easy. No prior experience is required — simply unplug your old handset and connect this one via the 5-pin plug. With just a few minutes, you can restore full functionality to your chair and enjoy the satisfaction of a successful DIY repair.
Technical Specifications
Technical Specifications
| Brand / Model | Okin HS.13.04.03 |
|---|---|
| Application | Dual actuator recliner chairs and lift chairs |
| Power Rating | DC 29V, 2A, IP20 |
| Buttons | 4 × raised buttons with illustrated functions |
| LED Indicator | Blue LED on front face |
| Dimensions | 165mm (L) × 50mm (W) × 26mm (H including buttons) |
| Cable Type | Straight and part-coiled |
| Cable Length | 1470mm total (270mm coiled section relaxed) |
| Connector | 5-pin straight male DIN plug with retaining clasp tabs |
| Storage Hook | 1 × fixed hook (non-removable) |
| Colour | Black housing with blue LED light |
How To
How To
How To Install the Okin HS.13.04.03 Handset (Dual Actuator Recliners & Lift Chairs)
You Can Do It. Replacing a handset is a quick DIY job. Read all steps before starting. If you need help, contact our support team.
What You’ll Need
- New Okin HS.13.04.03 handset
- Torch or phone light
- Phone or camera (to take photos before you start)
- Optional: a few small cable ties
- Optional: a helper if you need to tilt the chair
Safety First
- Unplug the transformer from the wall and disconnect the DC lead from the chair before any work.
- Allow any power supply indicator lights to go off fully.
- IP20 rating means indoor use only. Keep liquids away from connectors and electronics.
- If you need to tilt or move the chair, follow the safe lifting tips below.
Step-by-Step Instructions
- Power down and isolate. Switch off at the wall and unplug the transformer. Disconnect the DC plug from the chair if accessible.
- Take clear photos. Photograph the existing handset, the cable routing, tie points, and the 5-pin socket it is plugged into. These photos are your reference for reassembly.
- Prepare the workspace. Clear the area around the chair. Protect the floor with a towel or carton if you plan to tilt the chair.
- Access the handset plug. Locate where the current handset plugs in. It is usually a 5-pin DIN socket located under the seat base or near the control box.
- Safe chair tilting (if needed). If access is tight, gently tilt the chair onto its back. Ask a helper to assist. Bend at the knees, keep your back straight, and lift with your legs. Keep the chair close to your body. Do not lift by moving parts or the footrest.
- Release the old handset. Remove the handset from its pocket or hook. Follow the cable to the plug. Cut any cable ties that secure the old lead. Do not cut the cable itself.
- Unplug the 5-pin DIN. Grip the plug body, not the cable. Many sockets have small retaining tabs. Press the tabs gently and pull straight out. Do not twist or yank.
- Route the new cable. Take the new HS.13.04.03. Route its straight and coiled sections to follow the same path you photographed. Keep the cable clear of sharp edges, scissor mechanisms, and moving linkages.
- Align and connect. Line up the 5 pins with the socket keyway. Push the plug straight in until it seats fully and the retaining tabs click. Never force the pins.
- Secure the lead. Use light cable ties to replicate the original tie points. Leave a little slack near moving parts so the cable is not under tension when the chair moves.
- Fit the storage hook. The handset has a fixed hook. Place it back into the side pocket or hang it on the seat-side hook for easy access.
- Restore power. Reconnect the DC lead to the chair if you removed it, then plug the transformer back into the wall and switch on.
- Function test. The blue LED should light when a button is pressed. Test each of the four illustrated buttons. Confirm smooth and correct movement for both actuators (backrest and footrest) and, for lift chairs, test the lift and lower functions.
- Final checks. Cycle the chair through its full range while watching the cable. Ensure it does not stretch, rub, or pinch. Adjust cable ties if needed.
Troubleshooting
- No response or LED off: Check wall power, transformer connections, and that the 5-pin plug is fully seated.
- Intermittent operation: Inspect the cable path for pinches and re-tie with a little slack near moving parts.
- Buttons not moving as expected: Power cycle the chair at the wall and test again. If the issue persists, contact our support for guidance.
Safe Lifting Tips
- Ask for a second person if the chair is heavy.
- Clear a path before moving. Remove obstacles and rugs.
- Bend your knees, keep your back straight, and lift with your legs.
- Hold the chair close to your body and avoid twisting. Move your feet to turn.
Reviews (0)
Thank you for making an effort to leave a reivew but to protect against spam we only accept reviews from verified owners. Please proceed to login using the same email address you used when ordering the product.
Customer Login
- There are no reviews yet.
FAQs
FAQs
Will this handset work on my dual actuator recliner chair?
Yes. The HS.13.04.03 is designed for dual actuator recliners and lift chairs, giving you independent control of the backrest and footrest.
Do I need special tools to install it?
No special tools are required. Simply unplug the old handset, route the new cable the same way, and plug in the 5-pin connector. A screwdriver or torch may be useful depending on your chair’s design.
How long is the cable?
The total cable length is 1470mm, with a straight section and a 270mm coiled section (relaxed). This gives you flexibility while keeping the cable tidy.
What does the blue LED light do?
The blue LED on the front of the handset lights up when a button is pressed. This gives you quick feedback that the handset is sending a signal to the chair.
What if I’m still not sure this is the right remote?
We stock a wide range of replacement recliner remotes . Contact us with your chair’s model or serial number and we’ll help confirm the correct part for you.
Do I need any tools or an electrician to fit it?
No. This is a DIY instal simply plug and play.