

Leather Repair Colourants, Repair Kits
Leather Colour Changing Kits
$191.00 – $447.00
Give your leather furniture a whole new look with our Leather Colour Changing Kits that can change the colour of your leather and also change the sheen top-layer to one of 2 options gloss or high-gloss finish. This is a DIY bundle that includes all prep, colouring, sheen and wash liquids, and also includes the accessories like sponges & cloths that you'll need to do-it-yourself. The kit is sold in 250ml, 500ml, 1L, 2L and 3L sizes so you can get the best value for any size of leather colour changing. Powerful Colour Pigment Formula. Our highly concentrated colour changing pigment delivers great results when going from a light to another light coloured leather or going to a darker colour. Additional coats are required for going from dark to light. The pigment will cover any stitching too. Feel free to ask us for any questions or guidance on the right size kit for you. Unsure Which Colour You Need? Visit our Free Leather Samples page (click here) to receive six free colour samples of your choice and make sure you get the right colour match! read more
- Description
- What's Included?
- How To Tutorial
- Reviews (0)
- Add a review
Description
These colour changing kits are a complete bundle that include everything you need for colour changing on leather furniture such as recliners, dining chairs, sofas, lounge suites and ottoman. Please click the “What’s Included” tab above for a full list of products included in the kits.
Uniquely Formulated Colour Pigment Liquid
The included colour changing pigment is highly concentrated to get excellent results when going from a light coloured leather to another light coloured leather or going to a darker colour leather. However, going from a dark colour to a light colour may not always be possible and will at least require a few extra coats of the highly concentrated pigment.
The top coat sealer is used prevent the colour from rubbing off since the colour changing pigment doesn’t have as many self adhesion or bonding agents itself.
Please note that any stitching will be coloured over with the pigment as well.
Is This The Right Kit For Your Repair Needs?
We sell leather kits for various DIY jobs from cleaning & care, to tears & crack repairs. This kit is for changing the colour of the leather furniture to another colour, to see our leather repair kits (click here) or leather cleaning kits (click here) pages for other kits.
Is your leather fading or worn on localised areas such as the seat, head or armrests? If so, this is not the kit for you, instead see our Leather Touch Up Kits (click here) for repairing cosmetic issues like colour wear and minor peeling.
What's Included and Coverage Guide
Which size kit you need will depend on how big the leather surface is, and if your going from a light to dark colour, or from a dark leather colour to a light colour. With regards to the leather surface size then refer to the below coverage guide. If you want to change your leather from a dark colour to a light colour than you should oversize the kit because it takes a few extra coats of the pigment to go from dark to light.
- Choose our 250ml kit (click here) for approximate coverage of one ottoman.
- Choose our 500ml kit (click here) for approximate coverage of 4x dining chairs.
- Choose our 1 litre kit (click here) for approximately one large recliner; or two small chairs; or a small 2-seater.
- Choose our 2 litre kit (click here) for approximately one 4-seater lounge; or two recliner chairs.
- Choose our 3 litre kit (click here) for approximately one one 3 seater lounge and 2 chairs; or one 2 seater and a 3 seater; or a 4-6 seater corner lounge.
For any question, guidance, or support than please contact us by phone, live chat or email.
Available in Over 40 Colours. Need Help?
With 40+ standard colour options available, you will be sure to find something that matches your leather. To ensure you order the right leather repair kit, request 6x free leather samples from us before you purchase.
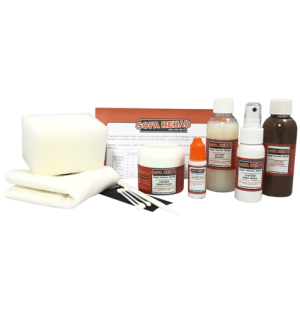
What's Included?
What's Included?
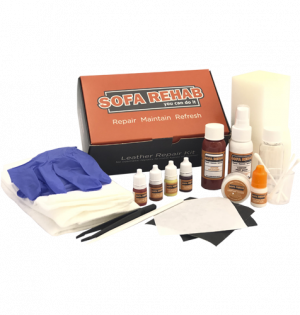
The 250ml, 500ml, 1 litre, 2 litre or 3 litre size of the kits is related to the bottle of leather colour pigment size that the kit comes with. The other items included in the kit are sized relative to the amount of colouring pigment and approximate coverage, see below list of contents for specific sizes and quantities included in the kit.
The 250ml size kit is sized for changing the colour of a small ottoman and other leather furniture with about the same small surface area.
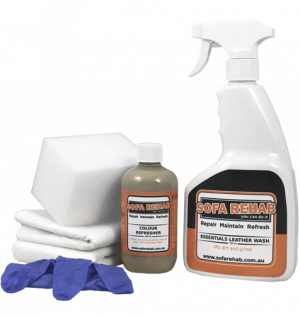
- 1x 500ml bottle of Essentials Leather Wash (with a spray trigger).
- 1x 250ml bottle of Essentials Leather Moisturiser.
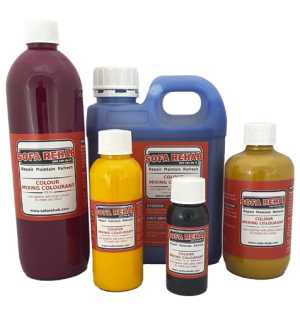
- 1x 250ml bottle of Recolouring Pigment of your choice.
- 1x 125ml bottle of Leather Prep Wash.
- 1x 125ml bottle of Leather Primer.
- 1x 125ml bottle of Top Coat Sealer in the sheen of your choice.
- 1x Leather brush.
- 4x Lint free cloths.
- 4x Sponges.
- 1x Pair latex gloves.
- 5x 600 Grade sandpaper.
- 1x Pair latex gloves.
- 1x Paint roller and tray kit.
- 2x Colour strainers.
- Step-by-step instructions.
The 500ml size kit has the approximate coverage for 4x dining chair seats.
- 1x 500ml bottle of Essentials Leather Wash (with a spray trigger).
- 1x 250ml bottle of Essentials Leather Moisturiser.
- 1x 500ml bottle of Recolouring Pigment of your choice.
- 1x 250ml bottle of Leather Prep Wash.
- 1x 250ml bottle of Leather Primer.
- 1x 250ml bottle of Top Coat Sealer in the sheen of your choice.
- 1x Leather brush.
- 4x Lint free cloths.
- 4x Sponges.
- 1x Pair latex gloves.
- 5x 600 Grade sandpaper.
- 1x Pair latex gloves.
- 1x Paint roller and tray kit
- 2x Colour strainers.
- Step-by-step instructions.
The 1 litre kit is suitable for a large recliner; or two small chairs; or a small 2-seater.
- 1x 750ml bottle of Essentials Leather Wash (with a spray trigger).
- 1x 500ml bottle of Essentials Leather Moisturiser.
- 1x 1L bottle of Recolouring Pigment of your choice.
- 1x 250ml bottle of Leather Prep Wash.
- 1x 250ml bottle of Leather Primer.
- 1x 250ml bottle of Top Coat Sealer in the sheen of your choice.
- 1x Leather brush.
- 4x Lint free cloths.
- 4x Sponges.
- 1x Pair latex gloves.
- 10x 600 Grade sandpaper.
- 1x Pair latex gloves.
- 1x Paint roller and tray kit
- 2x Colour strainers.
- Step-by-step instructions.
The 2 litre size kit is suitable for a 4 seater lounge; or two recliner chairs.
- 1x 750ml bottle of Essentials Leather Wash (with a spray trigger).
- 1x 500ml bottle of Essentials Leather Moisturiser.
- 2x 1L bottle of Recolouring Pigment of your choice.
- 1x 500ml bottle of Leather Prep Wash.
- 1x 500ml bottle of Leather Primer.
- 1x 1L bottle of Top Coat Sealer in the sheen of your choice.
- 1x Leather brush.
- 4x Lint free cloths.
- 4x Sponges.
- 1x Pair latex gloves.
- 10x 600 Grade sandpaper.
- 1x Pair latex gloves.
- 1x Paint roller and tray kit.
- 2x Colour strainers.
- Step-by-step instructions.
The 3 litre kit is suitable for approximate coverage of one 3 seater lounge and 2 chairs; or one 2 seater and a 3 seater; or a 4-6 seater corner lounge.
- 1x 750ml bottle of Essentials Leather Wash (with a spray trigger).
- 1x 500ml bottle of Essentials Leather Moisturiser.
- 3x 1L bottle of Recolouring Pigment of your choice.
- 1x 500ml bottle of Leather Prep Wash.
- 1x 500ml bottle of Leather Primer.
- 1x 1L bottle of Top Coat Sealer in the sheen of your choice.
- 1x Leather brush.
- 4x Lint free cloths.
- 4x Sponges.
- 1x Pair latex gloves.
- 10x 600 Grade sandpaper.
- 1x Pair latex gloves.
- 1x Paint roller and tray kit.
- 2x Colour strainers.
- Step-by-step instructions.
How To Tutorial
How To Tutorial
Leather Colour Changing Kit Instructions
To achieve a successful and permanent change of colour to the leather, follow each step in numerical order, always starting with 1 1, 2.
Step 1 – Leather Wash
Spray the Leather Wash directly onto the leather surface and use the cleaning brush to agitate the dirt, oils and other contaminants from the leather surface and from deep within the embossed grain. Then wipe clean with the lint free cloth.
NB: The leather surface MUST be free from all dirt, oils and contaminants to achieve the best adhesion of the products.
Step 2 – Sanding
Using the 600 grade grit paper, lightly sand the entire leather surface to disturb the tannery clear coat. You are not looking to scratch the leather surface or sand it smooth, rather you just want to sand enough to expose the pigmented layer.
Step 3 – Prep Wash
Spray prep wash directly onto the leather surface using the lint free cloth to further prepare the surface and remove the tannery clear coat, any stubborn dirt, oils and contaminants.
Step 4 – Repeat 2 & 3
Repeat steps 2 and 3.
Step 5 – Leather Primer
Apply ample Leather Primer with the sponge provided in a circular motion ensuring a thin even coat is achieved and use pressure to advance the adhesion of the primer. Apply two coats and allow to either fully air dry for approximately 1 hr between coats or use a hairdryer to speed up the drying process.
Step 6 – Leather Recolouring Pigment
First, strain all the pigment using the paper strainer to remove any particles from the recolouring pigment. Apply the first coat of recolouring pigment using the sponge. This is best applied in a circular motion whilst applying pressure to advance the adhesion, paying particular attention to high traffic areas, seams and hard to reach areas (you are not looking to get full or even coverage with the first or second coat). Allow to fully air dry between coats or use a hairdryer to speed up the drying process.
Step 7 – Apply More Coats
Apply further coats of recolouring pigment with either a sponge, foam roller or sprayer Apply approximately 3-4 coats to achieve an even coverage (expect more coats if going from a dark colour to light colour) and allow to dry fully between coats.
Step 8 – Wait 24 Hours
Wait 24 hours after applying the last coat of recolouring pigment, before proceeding to the next steps. Do not touch, sit on, or use the leather item.
Step 9 – Top Coat Sealer
After 24 hours, strain the top coat sealer with the paper paint strainer to remove any particles from the sealer. Apply 2 even coats of top coat sealer using either a sponge, foam roller or sprayer. Allow to air dry fully between coats or use a hairdryer to speed up the drying process.
Step 10 – Wait Another 24 Hours
Wait 24 hours before touching and using the item as normal.
Step 11 – Leather Moisturiser
After 14 days, apply ample Leather Moisturiser to all areas of the leather using the lint free cloth to protect the new coating. Once dry, polish the leather surface. Note, you may experience slight colour bleeding onto the lint free cloth when applying the moisturiser, this is normal for the first time and should not happen on further applications.
Step 12 – Maintenance
As with all leather products, ongoing regular care, cleaning and maintenance is required to ensure durability and longevity of the leather and its coatings. Sofa Rehab recommends using our Leather Care Kit every 3-4 months.
Video tutorials can be found on our YouTube channel or for any technical support, call 07 2111 4088.
- Before commending any repair, always pre-test the products in an inconspicuous area.
- Pease note any use of our products will only be successful on a real leather or vinyl surface that is in fair/good condition, clean and free from contaminants such as oils, dirt and grime.
Pro Tips:
- Us a hairdryer to speed up drying times.
- Use a foam roller kit to apply the pigment will use less paint and save time.
- Rinse the sponges and foam rollers after each stage to preserve for future use.
Reviews (0)
Thank you for making an effort to leave a reivew but to protect against spam we only accept reviews from verified owners. Please proceed to login using the same email address you used when ordering the product.
Customer Login
- There are no reviews yet.
Related products
$15.00 – $285.00
Leather & Vinyl Colour Mixing Colourants
$37.00 – $110.00
Essentials Leather & Vinyl Repair Kit
$98.00 – $215.00
Essentials Leather Crack Repair Kits
$99.00 – $162.80
