


- Description
- How To Tutorial
- What's in the Kit
- Reviews (10)
- FAQs
- Add a review
Description
Essential Leather Crack Repair Kit – DIY Repair for Cracking & Crazing
Our Essential Leather Crack Repair Kit is a complete solution designed to repair light, medium and heavy cracking and crazing on leather and vinyl surfaces. Whether it’s a worn seat cushion, armrest or high traffic area, this kit allows you to rebuild the damaged surface, restore flexibility and apply a fresh colour finish for long-lasting results.
Designed specifically for do-it-yourself use, this kit includes everything you need with easy-to-follow instructions, making it suitable for beginners with no prior experience. With just a bit of time and preparation, you can achieve professional-level results at home and extend the life of your furniture.
Watch Us Repair This Cushion -
Full Step-by-Step Repair Video
We’ve created a complete step-by-step instructional video demonstrating exactly how to use the Essential Leather Crack Repair Kit from start to finish. In this video, we restore a 20+ year old seat cushion with heavy cracking and crazing to showcase just how effective this DIY kit can be.
Follow along as we guide you through preparation, filling, binding and recolouring the leather surface. This real-world example shows the transformation you can achieve and gives you the confidence to tackle your own repair project.
Unsure Which Colour to Order? Get Free Leather Samples
With over 60 standard colours available, choosing the right match is important for achieving the best repair result. If you’re unsure, take advantage of our free leather samples service (click here) to order.
You can order up to 6 colour samples to compare at home against your furniture, allowing you to confidently select the closest match before starting your repair.
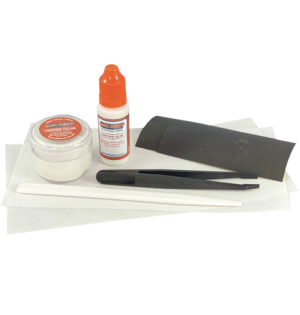
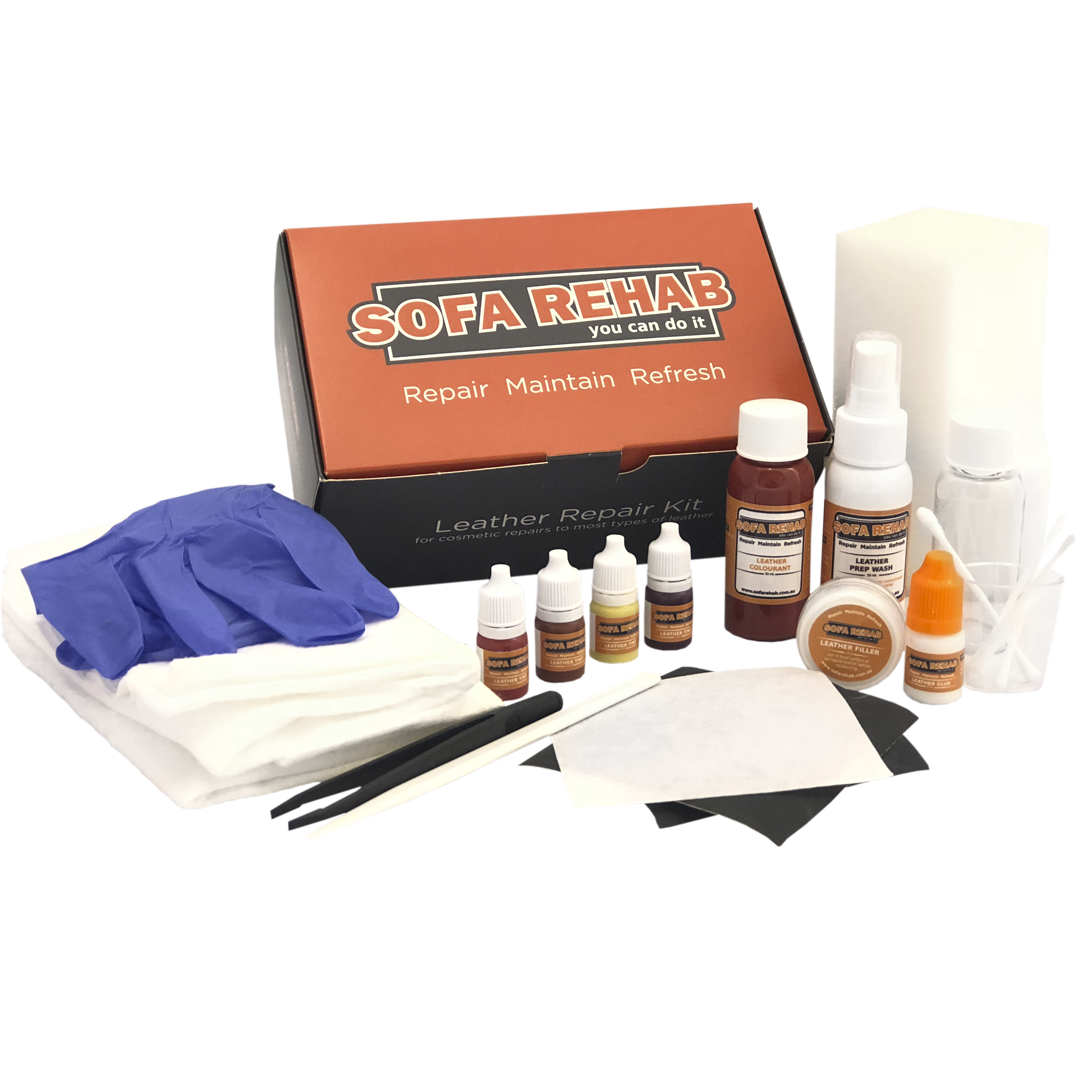
Each Kit Includes Everything You'll Need
Each kit includes carefully selected components matched to the size of the colourant you choose, ensuring you have the correct quantities of all supporting materials to complete your repair.
Kit sizes are based on the amount of leather & vinyl paint included (50ml, 125ml, 250ml, 500ml and 1 Litre), with all other materials proportioned accordingly to suit the size selected.
The 50ml Kit is suitable for coverage of approximately 1 x armrest or standard seat.
- 1 x 50ml leather & vinyl paint
- 1 x comprehensive step by Step instructions
- 1 x 600 grade grit paper
- 1 x 15ml leather glue
- 1 x 50ml leather prep wash
- 1 x 100g leather crack filler
- 1 x 125ml leather binder
- 1 x palette knife
- 1 x white microfibre cloth
- 1 x touch up sponge
- 3 x touch up tips
The 125ml Kit is suitable for coverage of approximately 2-3 seat panels.
- 1 x 125ml leather & vinyl paint
- 1 x comprehensive step by Step instructions
- 1 x 600 grade grit paper
- 1 x 15ml leather glue
- 1 x 50ml leather prep wash
- 1 x 100g leather crack filler
- 1 x 125ml leather binder
- 1 x palette knife
- 1 x white microfibre cloth
- 1 x touch up sponge
- 3 x touch up tips
The 250ml Kit is suitable for coverage of approximately 3 x large seat panels and 2 x armrest panels.
- 1 x 250ml leather & vinyl paint
- 1 x comprehensive step by Step instructions
- 2 x 600 grade grit paper
- 1 x 15ml leather glue
- 1 x 50ml leather prep wash
- 1 x 250g leather crack filler
- 1 x 125ml leather binder
- 1 x palette knife
- 1 x white microfibre cloth
- 1 x touch up sponge
- 3 x touch up tips
Coverage – Approximately 1 x Large 3 seater (complete).
- 1 x 500ml leather & vinyl paint
- 1 x comprehensive step by Step instructions
- 2 x 600 grade grit paper
- 1 x 15ml leather glue
- 1 x 125ml leather prep wash
- 1 x 250g leather crack filler
- 1 x 250ml leather binder
- 1 x palette knife
- 1 x white microfibre cloth
- 1 x touch up sponge
- 3 x touch up tips
The 1 litre kit is suitable for coverage for approximately 1 x large 3 seater and 2 x arm chairs (complete).
- 1 x 1 litre leather & vinyl paint
- 1 x comprehensive step by Step instructions
- 2 x 600 grade grit paper
- 1 x 30ml leather glue
- 1 x 250ml leather prep wash
- 1 x 250g leather crack filler
- 1 x 250ml leather binder
- 1 x palette knife
- 1 x white microfibre cloth
- 1 x touch up sponges
- 6 x touch up tips
Save Time & Money and Do It Yourself
Skip the cost of professional repairs and restore your leather yourself with confidence. Our Essential Leather Crack Repair Kit is designed to be easy to use, even for beginners, with no special tools required.
With our step-by-step instructions and video tutorials, you’ll have everything you need to complete the repair yourself. Save money, extend the life of your furniture and enjoy the satisfaction of bringing it back to life with your own hands.
How To Tutorial
How To Tutorial
How To Use the Essentials Leather Crack Repair Kit
To achieve a successful repair, follow the steps below in numerical order. Always begin with Step 1 and complete each stage before moving to the next.
Important: Before commencing any repair, always pre-test the products in an inconspicuous area. Please note the products will only be successful on real leather or vinyl that is in fair to good condition, clean, and free from contaminants such as oils, dirt and grime.
Step 1. Leather Prep Wash
Spray Leather Prep Wash over and around the repair area, then wipe away any dirt, oils and other contaminants with the included microfibre cloth. Allow the area to dry fully before proceeding.
Step 2. Sand with Grit Paper
Sand the repair area to further remove the top coat, along with any raised or loose edges. This helps prepare the surface for the following repair steps.
Step 3. Bond
Ensure the surfaces are dry. Apply Leather Glue to any raised edges or splits and bring them together. Hold the surfaces together until the glue has set. A hairdryer can be used to help speed up the process.
Please note: Before carrying out the next step, the glue must be left for a minimum of 24 hours to achieve maximum hold.
Step 4. Leather Binder
For typical crack repair, apply 2 thin coats of Leather Binder to the cracked areas using the sponge, allowing each coat to dry before applying the next. Use pressure to force the Leather Binder down into the cracks. A hairdryer can be used to speed up the drying process.
For light cracks, apply additional coats until the surface becomes level, allowing each coat to dry before applying the next. If all cracks are filled at this stage, proceed to Step 7.
Step 5. Leather Crack Filler
A. Using the palette knife provided, apply thin coats of Leather Crack Filler to fill the cracks. Allow the filler to dry between coats. For deeper cracks, continue applying filler until the desired level is achieved. A hairdryer can be used to speed up the drying process.
B. Sand the repaired areas level and smooth using the grit paper.
Step 6. Wipe Clean
Dampen the microfibre cloth with water or Leather Prep Wash and wipe over the repair area to remove any residue, then allow the area to dry fully.
Step 7. Leather & Vinyl Paint Application
Use the touch up sponge to dab the first application of colourant in a thin, even coat over the filled areas and allow it to dry fully. A hairdryer can be used to speed up the drying process.
Check over the repair area and, if required, repeat Step 5 before continuing. Once ready to proceed, continue applying the leather and vinyl paint in thin coats, gradually building coverage. Applying 3 to 4 coats of colourant is normal.
Tip: Feather the repair outwards during the final application stages and gently massage the area to help relax the surface and improve blending.
Aftercare Information
You must allow at least 14 days before using any cleaning or moisturiser products on the repaired area. Please also note that you may experience slight colour transfer onto the cloth when cleaning or moisturising. This is normal and can be expected for the first 2 or 3 uses.
What's in the Kit
What's in the Kit
What’s Included in Each Kit & Coverage Guide
The 50ml Kit is suitable for coverage of approximately 1 x armrest or standard seat.
- 1 x 50ml leather & vinyl paint
- 1 x comprehensive step by step instructions
- 1 x 600 grade grit paper
- 1 x 15ml leather glue
- 1 x 50ml leather prep wash
- 1 x 100g leather crack filler
- 1 x 125ml leather binder
- 1 x palette knife
- 1 x white microfibre cloth
- 1 x touch up sponge
- 3 x touch up tips
The 125ml Kit is suitable for coverage of approximately 2 to 3 seat panels.
- 1 x 125ml leather & vinyl paint
- 1 x comprehensive step by step instructions
- 1 x 600 grade grit paper
- 1 x 15ml leather glue
- 1 x 50ml leather prep wash
- 1 x 100g leather crack filler
- 1 x 125ml leather binder
- 1 x palette knife
- 1 x white microfibre cloth
- 1 x touch up sponge
- 3 x touch up tips
The 250ml Kit is suitable for coverage of approximately 3 x large seat panels and 2 x armrest panels.
- 1 x 250ml leather & vinyl paint
- 1 x comprehensive step by step instructions
- 2 x 600 grade grit paper
- 1 x 15ml leather glue
- 1 x 50ml leather prep wash
- 1 x 250g leather crack filler
- 1 x 125ml leather binder
- 1 x palette knife
- 1 x white microfibre cloth
- 1 x touch up sponge
- 3 x touch up tips
The 500ml Kit is suitable for coverage of approximately 1 x large 3 seater lounge (complete).
- 1 x 500ml leather & vinyl paint
- 1 x comprehensive step by step instructions
- 2 x 600 grade grit paper
- 1 x 15ml leather glue
- 1 x 125ml leather prep wash
- 1 x 250g leather crack filler
- 1 x 250ml leather binder
- 1 x palette knife
- 1 x white microfibre cloth
- 1 x touch up sponge
- 3 x touch up tips
The 1 Litre Kit is suitable for coverage of approximately 1 x large 3 seater lounge and 2 x armchairs (complete).
- 1 x 1 litre leather & vinyl paint
- 1 x comprehensive step by step instructions
- 2 x 600 grade grit paper
- 1 x 30ml leather glue
- 1 x 250ml leather prep wash
- 1 x 250g leather crack filler
- 1 x 250ml leather binder
- 1 x palette knife
- 1 x white microfibre cloth
- 1 x touch up sponge
- 6 x touch up tips
Reviews (10)
Thank you for making an effort to leave a reivew but to protect against spam we only accept reviews from verified owners. Please proceed to login using the same email address you used when ordering the product.
Customer Login
FAQs
FAQs
Is this kit suitable for all types of leather?
This kit is suitable for most finished leather and vinyl surfaces. It is not suitable for suede or nubuck. If you are unsure, please refer to our leather identification guide or contact us for assistance.
Can I use this kit on deep cracks and heavily cracked areas?
Yes, this kit is designed for light, medium and heavy cracking and crazing. For deeper cracks, multiple applications of filler and binder may be required to build the surface back up before applying colour.
How do I choose the right colour?
We offer over 60 standard colours. If you are unsure, we recommend using our free leather samples service where you can order up to 6 samples to compare at home for the best match.
How long does the repair take to complete?
Most repairs can be completed over a few hours for smaller repairs to a couple of days depending on drying times and the extent of the damage. Please note that after completing the repair, you should allow 14 days before cleaning or conditioning the area.
Do I need any special tools or experience to use this kit?
No, this kit is designed for DIY use and includes all the tools required. With our step-by-step instructions and video tutorials, even beginners can achieve great results.
Rolf
(verified owner)Used it on cracked leather seats in a car and it worked a treat. Would highly recommend this product
Julie bosgra
(verified owner)Amazing difference to my cracked and peeling leather lounge. It’s only been a few weeks since I repaired so hoping it doesn’t crack again too quickly but I have lots of product left over to touch up!
Natasha
Brilliant product, great results
Pam V
(verified owner)Great product for our old couch. Had some cracks in arms and back. Filler and colour have given it a bit more life. Much easier to apply than I thought and really pleased with outcome. Also had a seam in cushion that was starting to tear. The glue worked a treat.
Dave Barker
(verified owner)I had 20+ year old seats in car to repair. Deep cracks and scuffs to tackle. Took a while, as all processes were required but results were pretty good and returned car to tidy original condition.
Anne W
(verified owner)The products were delivered promptly. The instruction sheet was stuck to the inside of the box so was a bit hard to follow. However with the instructions and the youtube tutorials we managed. End result cracked leather lounge now refurbed and looking fantastic in Dark Red. Colour match was fantastic! Would highly recomend this product.
Peter Hahne
(verified owner)I like to thank Sofa Rehab for supplying quality product I spoke to your advisory about the extra colours that turned up which happen to be tint I use the product I’ve had it on my cushions now for 2 weeks and been using them everyday and they still look perfect highly recommended
N Reeves
(verified owner)Fantastic results, well worth the money and super service free m sofa rehab
Susan
Incredible result!
Fixed our worn and cracked white leather lounge. Easy to use and worth the effort. Would thoroughly recommend this product.
Laura
(verified owner)So very pleased with the end result. Product is amazing, very easy instructions to follow, I thought my sofa was a goner and before I decided to throw out I would try this last step . I could not find a video tutorial to follow for a severe crazed problem with my sofa so I followed the easy instructions and the end result was amazing.