La Z Boy Spare Parts, Recliner Button Switches
Limoss 0503115 HC239+2.5 Switch
$79.99
In stock
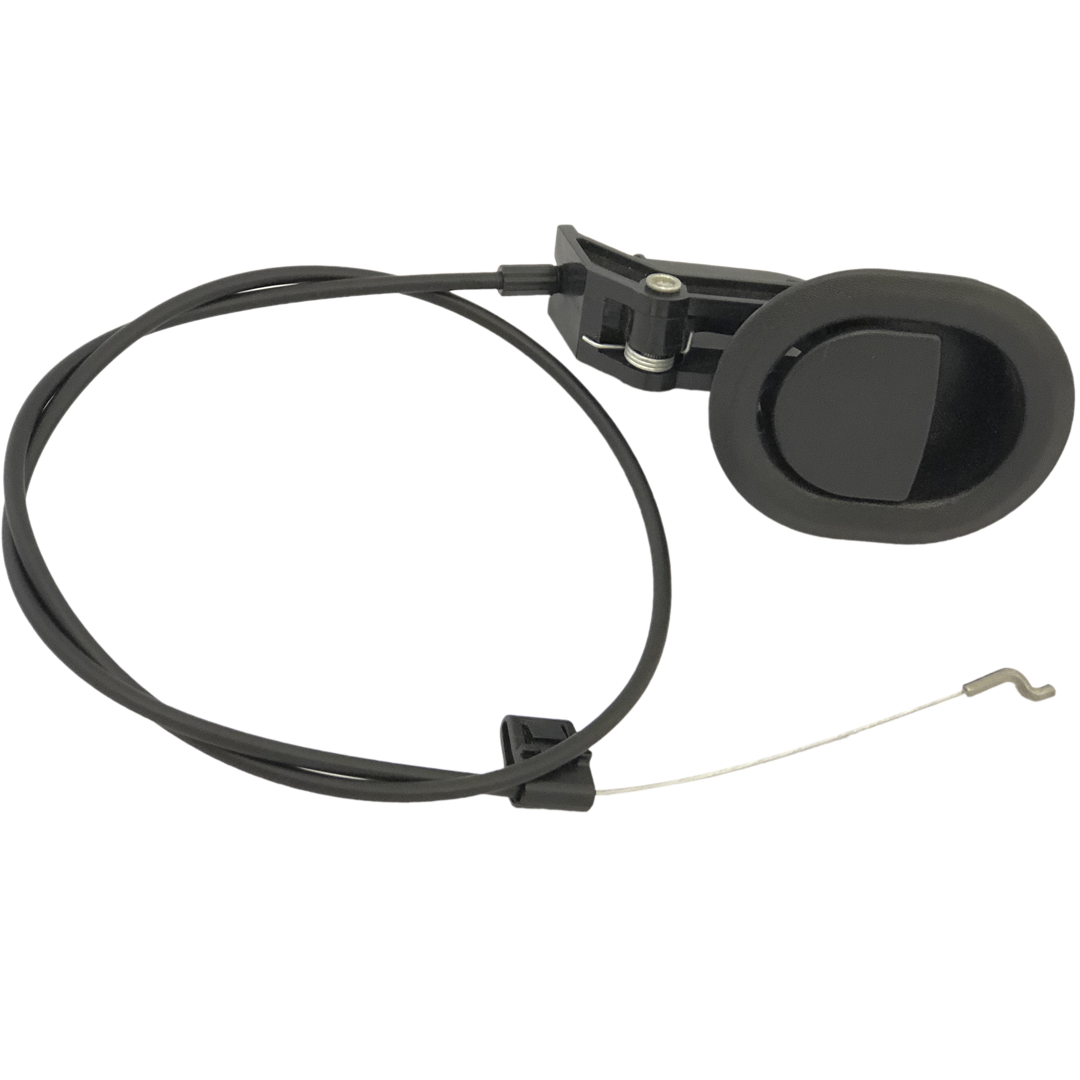
Limoss 0503115 HC239+2.5 genuine 5 button recliner switch assembly designed for dual actuator electric recliners. This complete 3 part replacement includes the metal control panel, rear mounting housing and full wiring harness with 5 pin DIN plug, 2 pin OI power connector and 8 pin system plug. Features an integrated charging port for recliner battery packs. 5 Button Limoss Recliner Switch with Battery Charging Port. Designed for dual motor recliners, this switch allows independent control of footrest and backrest positions plus a reset function. Commonly used in La Z Boy recliners and other brands, it is essential to match the part number 0503115. Need Help Finding the Right Recliner Switch? We stock all the popular recliner switches (click here). If you are still not sure which replacement power recliner chair or sofa switch is right for you please contact our helpful team. read more
In stock
- Description
- Technical Specifications
- How To
- Reviews (0)
- FAQs
- Add a review
Description
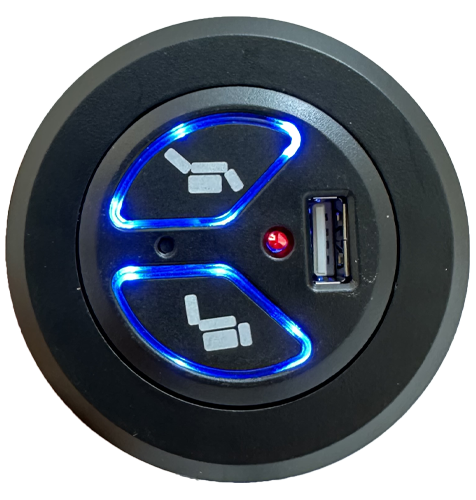
Limoss 5 Button Recliner Switch HC239+2.5 with Wiring Harness
The Limoss 0503115 HC239+2.5 is a genuine OEM 5 button recliner switch assembly designed for dual actuator electric recliners and lift chairs. This complete 3 part replacement includes the brushed metal control panel, rear plastic mounting housing, and a full wiring harness, making it an ideal solution for restoring full functionality to your recliner.
Operating on a standard 29V system, this switch allows independent control of the backrest and footrest, along with a home/reset function. It also features an integrated charging port for connecting a recliner battery pack, adding convenience and flexibility to your setup.
Complete 3 Part Replacement System
This is not just a replacement button switch, it is a complete control system designed to match specific recliner configurations. The set includes:
- Metal 5 Button Switch Panel: Silver finish with 5 button controls for full recliner operation.
- Rear Mounting Housing: Internal plastic case that mounts into the armrest (secured with screws, not included).
- Wiring Harness: Pre-fitted with all required plugs for connection to your recliner system.
The switch panel pushes into the housing and is secured with spring clips for a firm and flush fit within the armrest.
Commonly Used in La Z Boy Recliners and More
This Limoss switch is commonly found in La Z Boy electric recliners and lift chairs, as well as other furniture brands that utilise Limoss control systems. As this is a model-specific replacement, we recommend confirming your existing part number (0503115 or HC239+2.5) and visually matching the plugs before ordering.
If you’re unsure, our team is here to help identify the correct replacement for your recliner.
Need Help Finding the Right Replacement Switch?
We stock Australia’s largest range of electric recliner handsets and arm switches, from two-button toggles to eight-button multi-function panels. Browse our complete range of recliner toggle switches (click here), or contact us by phone, email or live chat for expert guidance from real furniture-repair technicians.
Save Time & Money and Do It Yourself
Replacing your recliner switch is a straightforward DIY repair that can be completed with basic tools such as a screwdriver. Simply remove the old unit, mount the new housing, connect the plugs, and push the switch into place.
With our step-by-step guides, video tutorials, and expert support, you can confidently complete the repair yourself. Save on costly call-outs and enjoy the satisfaction of getting your recliner back in action.
If you have any questions about compatibility or installation, feel free to contact our team, we’re here to help you every step of the way.
Technical Specifications
Technical Specifications
| Brand | Limoss |
| Part Number | 0503115 |
| Model Code | HC239+2.5 |
| Product Type | Electric Recliner Switch Assembly |
| Button Configuration | 5 Button Control |
| Application | Dual Actuator Electric Recliners & Lift Chairs |
| Common Compatibility | La Z Boy recliners and other furniture using Limoss systems |
| Input Voltage | 29V DC 2A |
| Output Voltage | 29V DC |
| Charging Port | Yes (for recliner battery connection if installed) |
| Assembly Type | 3 Piece Set |
| Included Components | Metal Switch Panel, Plastic Mounting Housing, Wiring Harness |
| Switch Material | Metal Front Panel |
| Switch Colour | Silver |
| Housing Material | Plastic Rear Casing |
| Mounting Method | Housing fixed internally with screws (not included), switch panel push-fit with spring clips |
| Harness Length | 1160mm |
| Connector 1 | 90° 5 Pin Male DIN Plug |
| Connector 2 | 2 Pin OI Female Plug |
| Connector 3 | 8 Pin White System Plug |
| Switch Dimensions | 108mm (W) x 28mm (H) x 23mm (D) |
How To
How To
How To Install the Limoss 0503115 HC239+2.5 Recliner Switch
Replacing your recliner switch is a straightforward do-it-yourself repair, but it is important to work carefully and stay organised. Before you begin, take a clear photo of the existing switch, plug layout and cable routing so you have a reference during reinstallation. If you need to move or tilt the recliner, always practice safe lifting techniques and get assistance if the chair is heavy or awkward to handle.
What You May Need
- Phillips head screwdriver
- Your phone or camera to take reference photos
- A torch if visibility inside the armrest is limited
Step 1. Disconnect the Power
Unplug the recliner from the wall power outlet before starting. If your recliner has a battery backup fitted, disconnect that as well. Never work on the switch or internal wiring while the chair is connected to power.
Step 2. Move the Recliner Safely Into Position
Carefully move the recliner so you can access the side arm and underside area where the switch wiring runs. Use safe lifting techniques and avoid twisting your back while moving the furniture. If the recliner is large, heavy or difficult to handle, ask another person to help you reposition it safely.
Step 3. Take Reference Photos
Before removing anything, take several clear photos of the existing switch, mounting position, plug connections and cable routing. This will make it much easier to install the new switch correctly and helps avoid confusion when reconnecting the harness.
Step 4. Remove the Old Switch
Depending on your recliner design, you may need to access the rear of the switch from inside the armrest or from underneath the chair. Remove any screws holding the old switch housing in place. Once loose, carefully ease the switch and housing out far enough to access the wiring plugs.
Step 5. Disconnect the Existing Wiring
Unplug the old switch harness one connection at a time. Match each plug with your reference photo and note where each one connects. This switch system typically includes a 90 degree 5 pin male DIN plug, a 2 pin OI female plug and an 8 pin white system plug. Do not pull on the wires directly, grip the plug bodies when disconnecting them.
Step 6. Fit the New Rear Housing
Position the new rear plastic housing into the armrest opening. Secure it internally with the appropriate screws if required (screws are not supplied). Make sure the housing is aligned neatly and sits flush in the opening before tightening.
Step 7. Route and Connect the New Wiring Harness
Feed the new harness through the same path as the original wiring. Use your photos to match the cable routing and avoid pinching or trapping wires. Reconnect each plug carefully into its matching socket:
- 90 degree 5 pin male DIN plug
- 2 pin OI female plug
- 8 pin white system plug
Make sure each connection is fully seated and secure.
Step 8. Clip the Metal Switch Into the Housing
Once the wiring is connected, push the metal switch panel into the mounted rear housing. The switch is held in place by spring clips, so press it in evenly until it clicks into position. Check that it sits securely and evenly in the armrest.
Step 9. Test the Switch
Reconnect the recliner to the power supply and test all button functions. Check the movement of the footrest and backrest, and confirm the switch responds correctly. If a battery backup is fitted, you can also test the charging port connection.
Step 10. Final Check
Once everything is working correctly, make sure the cables are tucked away safely and not rubbing on any moving parts of the recliner mechanism. Return the chair to its normal position using safe lifting techniques.
Need Help?
If you are unsure about plug compatibility, installation steps or whether this is the correct replacement for your recliner, contact our team for assistance before proceeding. We are here to help you get the right part and complete your repair with confidence.
Reviews (0)
Thank you for making an effort to leave a reivew but to protect against spam we only accept reviews from verified owners. Please proceed to login using the same email address you used when ordering the product.
Customer Login
- There are no reviews yet.
FAQs
FAQs
Will this work my recliner?
This switch is a model-specific replacement and must match your existing part number (0503115 or HC239+2.5) and plug configuration. It is commonly used in La Z Boy recliners and other furniture fitted with Limoss systems. If you're unsure, compare your plugs and layout or contact us for assistance before ordering.
How do I know if this is the correct replacement?
The best way to confirm is by checking the part number on your existing switch and matching all plug types. This unit includes a 5 pin DIN plug, 2 pin OI plug and 8 pin system plug. We recommend taking a photo of your current setup and comparing it, or sending it to us for confirmation.
Is this switch easy to install myself?
Yes, this is a DIY-friendly replacement. Installation typically involves removing the old switch, disconnecting the plugs, and connecting the new harness. A screwdriver is usually all that’s required, and the process can be completed in a short amount of time.
What do the 5 buttons control?
The 5 button layout is designed for dual actuator recliners, allowing independent control of the footrest and backrest, along with a home or reset function. This makes it suitable for more advanced recliner systems rather than basic single motor setups.
Does this switch support a battery backup?
Yes, this switch includes a charging port designed for recliner battery packs if your setup uses one. This allows you to connect and maintain a battery backup system for use during power outages.