Manual Recliner Spare Parts, Mechanism
4341 Manual Recliner Mechanism 500mm LHO
$315.00
In stock
The 4341 manual recliner mechanism kit by Leggett & Platt is a flat-pack replacement for broken recliner frames. Built from heavy-gauge powder-coated steel with Delrin™ bushes and pressed rivets, this durable mechanism offers smooth “EZ Operation”, close-to-the-wall action, and a 181 kg load rating. This version suits recliner furniture with a 500mm seat width and left-hand operation. 500 mm Left Hand Manual Recliner Kit. Includes 43-piece kit with side actions, drive shaft, stabilisers, base rails, springs, handle, release cable, linkage, KD brackets, and bolts. Seat width must be measured side-to-side between the inside seat rails. Supplied for left-hand operation — when seated, the release handle is operated with your left hand. Thinking of Upgrading to Electric Recliners? If you’d prefer powered comfort, we also supply a complete range of electric recliner mechanisms and upgrade kits (click here). These allow you to transform your manual recliner into a powered version. read more
In stock
- Description
- Technical Specifications
- What's in the Box
- How-To Tutorial
- Reviews (0)
- FAQs
- Add a review
Description
4341 Manual Recliner Mechanism – 500 mm Left Hand Kit– Flat Pack Kit
This 4341 replacement recliner mechanism is designed for recliner chairs, 2-seaters, 3-seaters, and sectional lounges that require a 500mm seat width frame. Manufactured by Leggett & Platt, it is built from heavy-gauge steel with Delrin™ bushes and machine-pressed rivets for strength and smooth operation. It features “EZ Operation”, close-to-the-wall action, and metal-to-floor stability, with a load rating of 181kg (suitable for occupants up to 160kg).
What’s Included in the 43 Piece Full Kit
Each 4341 manual recliner mechanism kit is supplied in flat-pack form with all the essential components needed to replace your broken recliner action. Refer to the “Whats in the Box” tab for the specific list of parts & quantities. It totals 43 pieces in each kit, giving you everything required to assemble and install your new recliner mechanism. The only items not included are the tools (socket set and spanner), which you’ll need for the installation.
Measuring Your Seat Frame Width
This mechanism is available in 500mm, 550mm, 600mm and 700mm seat widths. The seat width is measured side-to-side between the inside of the left and right seat rails. Please measure carefully to match your recliner frame and select the correct size before ordering.
Left or Right-Hand Operation Explained
When ordering, you’ll also need to choose whether your recliner is left-hand or right-hand operated. To identify this, sit in your recliner: if you operate the release handle with your left hand, you need a left-hand mechanism. If you operate it with your right hand, you need a right-hand mechanism. This ensures your new mechanism matches the configuration of your existing furniture.
Why Replace a Recliner Mechanism?
Over time, mechanisms can bend, bow, or loosen at the rivets, causing uneven or failed reclining action. Replacing the entire mechanism restores full structural integrity and functionality. This universal kit is suitable as a direct replacement for Leggett & Platt and many other branded mechanisms of similar geometry.
DIY Friendly – Assemble and Save
Supplied flat pack, this mechanism requires basic handyman skills to assemble. Basic instructions are included and all parts are supplied. With only a socket set, you can build and install this mechanism in about 40 minutes. By doing it yourself, you can save $$$ on costly repairs and enjoy the satisfaction of restoring your furniture.
Technical Specifications
Technical Specifications
Technical Specifications
| Model | 4341 manual recliner mechanism |
|---|---|
| Manufacturer | Leggett & Platt |
| Construction |
|
| Operation |
|
| Load Rating | 181 kg capacity Suitable for occupant weights up to 160 kg |
| Widths Available | 500mm, 550mm, 600mm, 700mm |
| How to Measure Seat Width | Measure side-to-side between the inside faces of the left and right seat rails. |
| Handed Operation |
|
| Compatibility | Supplied with large plastic oval handle and release cable. Also works with:
|
| Kit Contents | 43 pieces See “What’s In The Box” tab for full breakdown. |
| Assembly | Flat-pack self-assembly using a socket set and spanner |
| Estimated Assembly Time | Approximately 30–40 minutes with basic handyman skills |
| Applications |
|
| Brand Interchangeability | Designed by Leggett & Platt; can replace many RMT and generic mechanisms. Note: Minor modification or alteration may be required depending on frame design. |
What's in the Box
What's in the Box
What's in the Box
Flat-pack kit (43 pieces) — everything needed for assembly is included, except the tools (socket set and spanner). Inside the box:
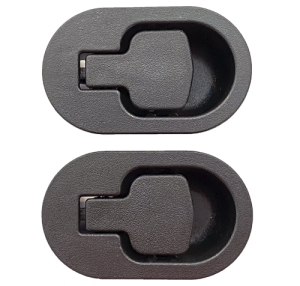
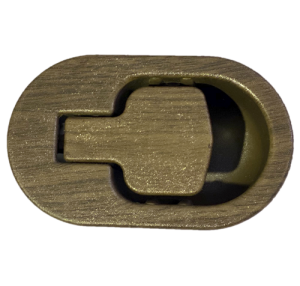
- 2× 4341 side actions (1× left, 1× right)
- 1× drive shaft
- 3× stabiliser bars
- 2× base rails
- 4× glides with nuts
- 2× springs — 1× 117 mm lockdown spring; 1× 180 mm footrest release spring
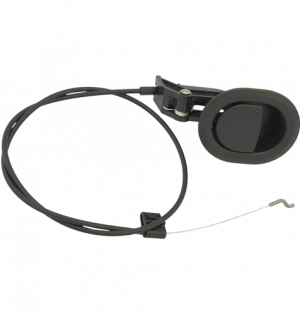
- 1× large oval plastic recliner handle (115 mm × 70 mm × 38 mm)
- 1× recliner release cable
- 1× retaining clip for the handle
- 1× release linkage (left-hand or right-hand, as ordered)
- 1× pair of KD backrest brackets (fasteners not supplied)
- 19× bolts and fixings
Total: 43 pieces — a complete replacement kit ready for assembly and installation.
How-To Tutorial
How-To Tutorial
How to Install
The 4341 manual recliner mechanism kit comes flat-packed and requires assembly before fitting into your furniture. Follow the steps below with a socket set, spanner, Phillips screwdriver, and pliers (optional for spring fitting). Estimated assembly and installation time is 30–40 minutes.
Tools required:
- Socket set
- Spanner
- Phillips screwdriver
- Pliers (optional, for spring fitting)
Step 1 – Assemble the side actions and drive shaft
Lay out the left and right side actions. Connect them using the drive shaft, ensuring the largest side is in the fully retracted position. Fix in place with 2x 25mm bolts.
Step 2 – Install the stabiliser bar
Position the stabiliser bar with the 90° flat end just behind the drive shaft. Secure with 4x 13mm bolts.
Step 3 – Install the front and rear stabiliser tubes
Fit both stabiliser tubes to the frame and fix with 8x 13mm bolts.
Step 4 – Install the front and rear base rails
Attach the base rails using 4x 13mm bolts and 4x glides with nuts.
Step 5 – Fit the release linkage
Install the cable release linkage mechanism (left or right, depending on your order) with 1x 13mm bolt.
Step 6 – Attach the springs
Fit the springs in their correct positions. Use pliers if required to stretch and secure.
- 117mm lockdown spring
- 180mm footrest release spring
Step 7 – Install the mechanism into your furniture
Position the assembled mechanism into your recliner frame and secure using the original fixings and mounting points from your old mechanism.
Step 8 – Fit the handle and cable
Install the supplied oval plastic handle and release cable with a Phillips screwdriver. If reusing an existing handle style, fit that instead (plastic oval, small oval, paddle lever, or D-pulley parachute).
Step 9 – Refit the backrest
Slide the backrest into position. If you need to adjust or replace the KD brackets supplied with the kit, do so now, reusing your original fasteners if required.
Step 10 – Test the recliner
Once everything is secured, sit in the chair and operate the handle or lever to confirm smooth opening and closing. Check that the springs engage correctly and the mechanism locks firmly in place.
Reviews (0)
Thank you for making an effort to leave a reivew but to protect against spam we only accept reviews from verified owners. Please proceed to login using the same email address you used when ordering the product.
Customer Login
- There are no reviews yet.
FAQs
FAQs
What sizes are available and how do I measure correctly?
We stock 500 mm, 550 mm, 600 mm and 700 mm seat widths. To measure your recliner, take the recliner mechanism out and measure side-to-side between the inside faces of the two seat rails (left to right). Match this measurement as closely as possible to one of our standard sizes before ordering.
How do I know if I need left-hand or right-hand operation?
Sit in your recliner as normal. If you use your left hand to pull the release handle, you need a left-hand mechanism. If you use your right hand, then you need a right-hand mechanism. This ensures the handle position matches your existing setup.
Can I upgrade my manual recliner to an electric version?
Yes, you can. We supply a range of complete electric recliner mechanisms and upgrade kits. These allow you to transform your manual recliner into a powered version with simple push-button or remote control operation.
What tools do I need to assemble and install the kit?
You will need a socket set, spanner, and a Phillips screwdriver. Pliers are optional but can help when fitting the springs. All fixings and components are supplied in the kit, so no additional parts are needed.
Is this mechanism compatible with different handle styles?
Yes. The kit is supplied with a large metal oval handle and release cable, but it can also work with small oval handles, plastic handles, paddle levers, and D-pulley parachute style releases. You can reuse your original handle or purchase an alternative from our range.
Do you offer an assembly service?
No, we do not. This mechanism is supplied only as a flat-pack kit for worldwide shipping. It is designed for DIY assembly and installation with basic tools and handyman skills.